以x86上的linux0.11为例,简单记录下
linux0.11组成
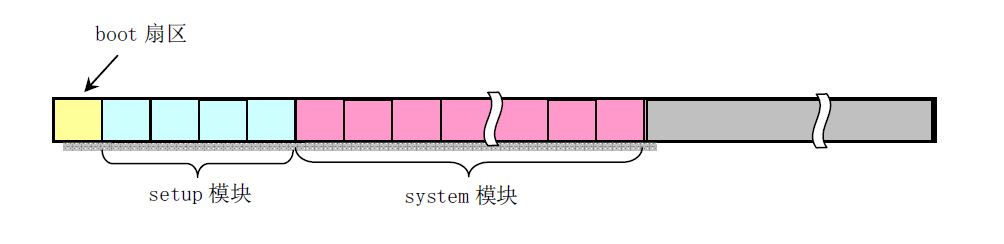
linux0.11在磁盘上的分布情况如图:
打开电源
此时CPU仍处于实模式,所以依旧使用16位下的CS:IP方式寻址
开机后CS:IP会被设为0xFFFF:0x0000,也就是执行0xFFFF0处的指令。该区域存放的是ROM BIOS的映射区
ROM BIOS会检查硬件是否正常,然后将磁盘0磁道0扇区的内容(512字节)读入0x7c00。接着将CS:IP设为0x07c0:0x0000跳转过去执行
为什么放到0x7c00?因为前面的内存需要存放一些其他的数据,比如中断向量表
boot/bootsect.s
1
2
3
4
5
6
7
8
9
10
11
12
13
14
15
16
17
18
BOOTSEG = 0x07c0 ! original address of boot-sector INITSEG = 0x9000 ! we move boot here - out of the way ... entry _start _start: mov ax ,#BOOTSEG ! 当前bootsect所处段地址,也就是0x07c0 mov ds ,ax mov ax ,#INITSEG ! 目标段地址0x9000 mov es ,ax mov cx ,#256 ! 移动256 个字 sub si ,si ! 将源偏移地址和目标偏移地址清零 sub di ,di rep movw ! 移动 jmpi go,INITSEG ! 跳转到0x9000 :go执行,跳过前面移动自身的代码 go: mov ax ,cs ! 从这继续执行 mov ds ,ax mov es ,ax
接着bootsect会使用int 0x13将setup模块读入到0x90200中
1
2
3
4
5
6
7
8
9
10
11
12
13
14
15
16
17
18
19
20
21
22
23
SETUPLEN = 4 ! nr of setup-sectors ... go: mov ax ,cs mov ds ,ax mov es ,ax ! 把es 设为0x9000 ,为读取setup做准备 ! put stack at 0x9ff00 . mov ss ,ax mov sp ,#0xFF00 ! arbitrary value >>512 ! load the setup-sectors directly after the bootblock. ! Note that 'es' is already set up . load_setup: mov dx ,#0x0000 ! drive 0 , head 0 mov cx ,#0x0002 ! sector 2 , track 0 mov bx ,#0x0200 ! address = 512 , in INITSEG mov ax ,#0x0200 +SETUPLEN ! service 2 , nr of sectors int 0x13 ! read it jnc ok_load_setup ! ok - continue mov dx ,#0x0000 mov ax ,#0x0000 ! reset the diskette int 0x13 j load_setup
1
2
3
4
5
6
7
8
9
10
11
12
13
14
15
ok_load_setup: ! Get disk drive parameters, specifically nr of sectors/track mov dl ,#0x00 mov ax ,#0x0800 ! AH =8 is get drive parameters int 0x13 mov ch ,#0x00 seg cs mov sectors,cx ! 把获取到的信息保存到sectors处 mov ax ,#INITSEG mov es ,ax ! 将es 恢复 ... sectors: ! 存放磁盘信息 .word 0
1
2
3
4
5
6
7
8
9
10
11
12
13
14
15
16
! Print some inane message mov ah ,#0x03 ! read cursor pos xor bh ,bh int 0x10 mov cx ,#24 ! msg1的长度,共24 个字节 mov bx ,#0x0007 ! page 0 , attribute 7 (normal) mov bp ,#msg1 mov ax ,#0x1301 ! write string, move cursor int 0x10 ! 显示msg1 ... msg1: .byte 13 ,10 ! \r\n .ascii "Loading system ..." .byte 13 ,10 ,13 ,10
载入system模块,放置到0x10000
后面的setup模块又会把system放到0x00000去,之所以这么麻烦还是因为0x00000-0x10000存放了中断向量表等信息,后面setup依然需要用到它们
1
2
3
4
5
6
7
8
9
10
11
12
13
14
15
16
17
18
19
20
21
22
23
24
25
26
SYSSIZE = 0x3000 ... SYSSEG = 0x1000 ! system loaded at 0x10000 (65536 ). ENDSEG = SYSSEG + SYSSIZE ! where to stop loading ... ! ok, we've written the message, now ! we want to load the system (at 0x10000) mov ax,#SYSSEG mov es,ax ! segment of 0x010000 call read_it ! 读入system模块,es为参数 ... read_it: mov ax,es test ax,#0x0fff die: jne die ! es must be at 64kB boundary xor bx,bx ! bx is starting address within segment rp_read: mov ax,es cmp ax,#ENDSEG ! have we loaded all yet? jb ok1_read ret ok1_read: ! 这里计算要读的磁道数 ... ok2_read: call read_track ! 真正的读磁道在这里
bootsect结束,跳转到0x90200上的setup模块
1
2
3
4
5
! after that (everyting loaded), we jump to ! the setup-routine loaded directly after ! the bootblock: jmpi 0 ,SETUPSEG
代码最后还有一个.org指令,用于填充字节,保证bootsect一定是512字节
1
2
3
4
5
.org 508 root_dev: .word ROOT_DEVboot_flag: .word 0xAA55
boot/setup.s
1
2
3
4
5
6
7
8
9
10
11
12
13
14
15
... ! Get memory size (extended mem, kB) mov ah ,#0x88 int 0x15 mov [2 ],ax ! Get video-card data: ... ! check for EGA/VGA and some config parameters ... ! Get hd0 data ... ! Get hd1 data ...
1
2
3
4
5
6
7
8
9
10
11
12
13
14
15
16
! first we move the system to it's rightful place mov ax,#0x0000 cld ! ' direction'=0, movs moves forward do_move: mov es,ax ! destination segment add ax,#0x1000 cmp ax,#0x9000 jz end_move mov ds,ax ! source segment sub di,di sub si,si mov cx,#0x8000 rep movsw jmp do_move
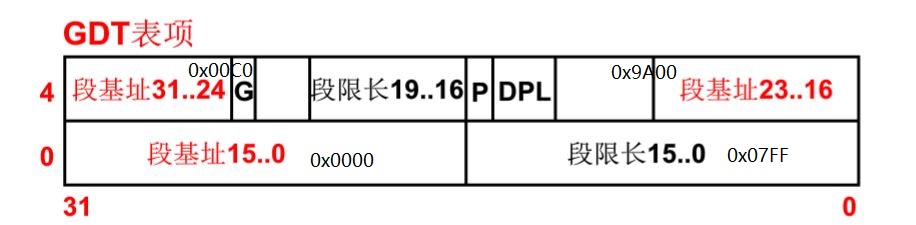
1
2
3
4
5
6
7
8
9
10
11
12
13
14
15
16
17
18
19
20
21
22
23
24
25
26
27
28
29
30
! then we load the segment descriptors end_move: mov ax ,#SETUPSEG ! right, forgot this at first. didn't work :-) mov ds,ax lidt idt_48 ! load idt with 0,0 lgdt gdt_48 ! load gdt with whatever appropriate ... gdt: .word 0,0,0,0 ! dummy 第一个描述符不用 ! 内核代码段选择符 .word 0x07FF ! 8Mb - limit=2047 (2048*4096=8Mb) .word 0x0000 ! base address=0 .word 0x9A00 ! code read/exec .word 0x00C0 ! granularity=4096, 386 ! 内核数据段选择符 .word 0x07FF ! 8Mb - limit=2047 (2048*4096=8Mb) .word 0x0000 ! base address=0 .word 0x9200 ! data read/write .word 0x00C0 ! granularity=4096, 386 idt_48 !这个时候的idt还是个空表 .word 0 ! idt limit=0 .word 0,0 ! idt base=0L gdt_48: .word 0x800 ! gdt limit=2048, 256 GDT entries .word 512+gdt,0x9 ! gdt base = 0X9xxxx
1
2
3
4
5
6
7
8
9
! Well, now's the time to actually move into protected mode. To make ! things as simple as possible, we do no register set-up or anything, ! we let the gnu-compiled 32-bit programs do that. We just jump to ! absolute address 0x00000, in 32-bit protected mode. ! 下面这两句会将cr0寄存器的第0位设为1,启动保护模式 mov ax,#0x0001 ! protected mode (PE) bit lmsw ax ! This is it! ! 0是偏移,8是gdt表项的第8个字节,也就是内核代码段选择符。合起来会跳到0x0000执行system模块 jmpi 0,8 ! jmp offset 0 of segment 8 (cs)
这个0x0000是咋算的呢…保护模式寻址的玩法是根据cs查gdt表+ip
1
2
3
4
5
! 内核代码段选择符 .word 0x07FF ! 8Mb - limit=2047 (2048 *4096 =8Mb) .word 0x0000 ! base address=0 .word 0x9A00 ! code read/exec .word 0x00C0 ! granularity=4096 , 386
把段基址的三个部分合起来就是0x00000000,ip代表的偏移还是0x0,0x00000000+0x0合起来还是0地址,也就是system模块的起始代码head.s
boot/head.s